

To make a stencil for spray paint, design a simple one-color image with bridges holding every floating part, cut it from cardstock, Mylar or stencil vinyl with a craft knife or a cutting machine, stick it flat to the surface, and spray light coats straight on from 8–12 inches away. The flatter the stencil sits, the sharper your edges.
Spray only on surfaces you own or have permission to paint: boards, canvas, furniture, clothes and legal walls. Work outdoors or with strong ventilation.
What do you need to make a spray paint stencil?
You need a stencil material, something to cut it with, a way to hold it flat, and spray paint. Everything else is optional. The material is the biggest choice, because it decides how sharp your edges are and how many times you can reuse the stencil.

Paint we suggest for stencils is at the end of this guide.
| Material | Best for | Reusable? | Cut with |
|---|---|---|---|
| Cardstock or file folders | First tries, quick one-offs | A few sprays | Craft knife, scissors, machine |
| Poster board | Large, simple stencils | A few sprays | Craft knife |
| Acetate film | Detailed reusable stencils | Yes, with care | Craft knife, some machines |
| Mylar stencil film | Stencils you will spray again and again | Yes, many times | Craft knife, cutting machines with a stencil film setting |
| Stencil or removable vinyl | Crisp edges on walls, wood, glass | Usually once | Cricut, Silhouette |
| Freezer paper | Fabric (it irons on, shiny side down) | Once | Craft knife, scissors, machine |
Tools:
- Craft knife with a pointed blade (an X-Acto #11 or similar) and spare blades
- Self-healing cutting mat, so the blade does not wander or dull on the table
- Painter’s tape for holding the stencil and masking around it
- Repositionable spray adhesive (the can should say “repositionable” or “stencil adhesive”; permanent adhesive will not let go)
- Spray paint in your colors, plus a scrap board for testing
- Respirator, gloves and eye protection, and a drop cloth or old cardboard
Step 1: Design a stencil that can be cut
A good stencil is one color, bold shapes, and no part floating loose. Start simpler than you think: a single word, a number, or a silhouette. You can always add layers later.
Bridges and islands
The most important stencil idea is the island: any shape completely surrounded by a cut, like the middle of an O, A, B, D, P, Q or R, or the eye of a face. Cut it out and it falls away, so your O sprays as a solid blob.
The fix is a bridge, a thin strip that connects the island to the rest of the sheet. Bridges leave small gaps in the sprayed shape, which is the classic stencil look you see on crates and military lettering.

Rules of thumb for bridges:
- Make them at least as thick as the thinnest part of your design, or they will tear when you cut or peel.
- Put them where they look natural, such as the top and bottom of an O, not at random angles.
- Two bridges on a big island hold it flatter than one.
For letters, skip the work: the stencil maker sets any word in a bridged stencil font and exports an SVG ready for a cutting machine, plus a free printable A–Z stencil alphabet.
Positive vs negative stencils
A negative stencil (the usual kind) is a sheet with the shape cut out: paint goes through the hole and you get a painted letter. A positive stencil, or mask, is the shape itself: you stick it down, spray around it, and peel it off to reveal an unpainted letter on a painted background. Positive masks need no bridges, which makes them handy for letters with lots of islands.
Making a stencil from a picture
To turn a photo into a stencil, raise the contrast in an image editor and use a threshold filter to reduce it to pure black and white. Then clean up specks, thicken thin lines, and add bridges. Free tools like Inkscape can trace the result into a vector file for a cutting machine.
Step 2: Transfer the design to your stencil material
How you get the design onto the material depends on what you are cutting:
- Cardstock: print the design straight onto it. Many home printers take cardstock, but the maximum weight varies, so check your printer’s paper specs first.
- Mylar or acetate: print on paper, tape the printout under the clear film, and cut through the film while following the lines underneath. Some people trace the outline onto the film first with a fine permanent marker.
- Large stencils: print the design tiled across several sheets with your printer’s poster setting, tape them together, then trace onto poster board or a big sheet of film.
- Cutting machine: no transfer needed. Upload the SVG or PNG and size it on screen.
Draw a few small registration ticks in the corners now if you plan more than one layer (see the layering section below).
Step 3: Cut the stencil by hand
Cut slowly, with a fresh blade, on a cutting mat. A sharp knife gives clean edges; a dull one drags and tears the corners.
- Cut the smallest details first while the sheet is still stiff. Big openings make the sheet floppy and harder to control.
- Pull the blade toward you in smooth, steady strokes, holding it like a pen.
- Turn the sheet, not your hand, as you go around curves. Your hand stays in its comfortable position.
- Stop exactly at corners and start a new cut from the corner, so you do not overcut into a bridge.
- Leave every bridge alone. If one tears, repair it on both sides with a small piece of clear tape.
- Push the cut pieces out gently. If a piece sticks, recut the line rather than pulling.
Change the blade as soon as it starts to drag. Blades are cheap; a ruined stencil is not.
Step 3 (machine): How to use stencil vinyl with a Cricut
A Cricut or Silhouette cuts stencils faster and more accurately than a knife, especially for small letters. Stencil vinyl is the usual material, because it sticks flat and gives the sharpest edges.
- Upload your design. In Cricut Design Space, upload the SVG and size it. In Silhouette Studio, open the file and set the size the same way.
- Choose the material. Select the stencil vinyl or removable vinyl setting. Do not mirror the design; vinyl stencils go on face up.
- Cut. Load the vinyl on a mat, shiny side up, and let the machine cut it.
- Reverse weed. This is the step that confuses most people. With a stencil you keep the background and remove the letters, the opposite of a normal vinyl decal. Pick out each letter shape with a weeding hook, but leave the islands in place.
- Apply transfer tape. Lay transfer tape over the whole stencil and burnish it with a scraper so every island sticks to the tape.
- Peel and place. Peel the backing off, position the stencil on your clean surface, and burnish it down firmly, especially around edges and islands.
- Remove the transfer tape by peeling it back on itself at a sharp angle, leaving the vinyl stencil stuck in place.
Many cutting machines can cut Mylar stencil film too, which gives you a reusable stencil instead of a one-time vinyl one. Check your machine’s material list for the right setting before you cut.
Step 4: Prepare the surface and stick the stencil down
Paint only sticks as well as the surface allows, and the stencil only stays sharp if it lies completely flat.
- Clean the surface. Wipe off dust and grease and let it dry. Sand glossy wood or metal lightly, and prime bare metal or plastic if the paint label says so.
- Mist the back of the stencil with repositionable adhesive from about 10 inches away, then wait a minute until it is tacky, not wet.
- Press it down from the center out, running your fingers along every edge and bridge.
- Tape the outer edges with painter’s tape.
- Mask a wide area around the stencil with paper or old newspaper. Overspray drifts much further than the edge of the stencil.
On fabric, put cardboard inside the shirt or bag so paint does not soak through to the back.
Step 5: How to spray paint with stencils
Spray light coats, straight on, from about 8–12 inches (20–30 cm) away. This single habit decides whether your edges come out sharp or fuzzy.
- Shake the can for a minute or two, until the mixing ball rattles freely.
- Test on scrap to check the spray pattern and color.
- Hold the can perpendicular to the surface. Spraying at an angle blasts paint under the edges of the stencil.
- Start spraying off the stencil, sweep across it in one smooth pass, and release after you have passed the other side. Starting and stopping on the design leaves blotches.
- Keep coats thin. The first coat should look patchy. Let it flash off (go dull) for a minute, then add a second and third coat until the color is solid.
- Do not chase full coverage in one coat. A heavy wet coat pools at the edges and seeps under the stencil.
Low-pressure cans are easier to control for stencil work. If you are new to aerosol paint, spray paint for beginners covers caps, pressure and can control.
Step 6: Remove the stencil
Lift the stencil while the last coat is still slightly tacky, not fully wet and not fully dry. Wet paint can drip into the edge; fully dry paint can crack along the edge as you pull.
- Peel from one corner and lift straight up, without sliding it across the paint.
- Vinyl stencils: peel back on themselves at a low angle, slowly, so the paint edge is not pulled up.
- Touch up any small gaps or bleed with a fine brush and matching paint once it is dry.
If you want letters without the bridge gaps, fill them in afterward with a small brush or a paint marker.
How do you make a multi-layer stencil?
A multi-layer stencil uses one stencil per color, sprayed in order on top of each other. It is how stencil artists get shading, outlines and 3D effects with a one-color technique.
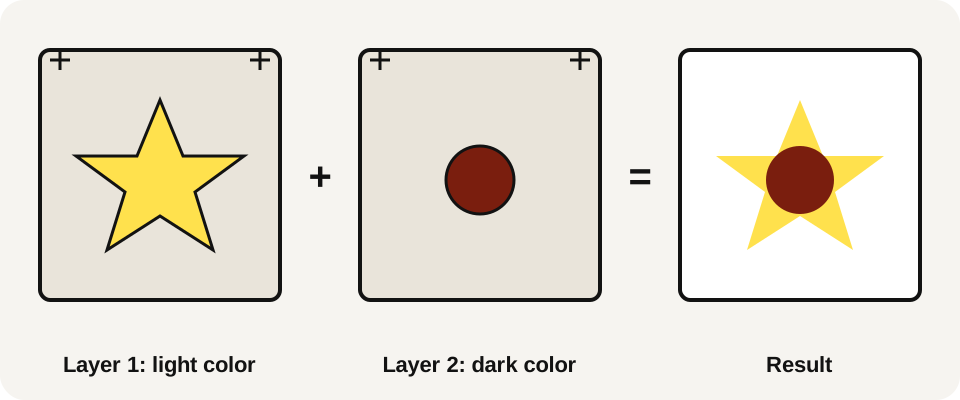
- Split the design by color or tone. Two or three layers is plenty to start: for example a light fill, a darker shadow and a black outline.
- Cut every layer from the same size sheet, with the design in the same position.
- Add registration marks. Cut small notches or crosses in the same corners of every sheet, or mark the corners of the first sheet on the surface with small pieces of tape.
- Spray from light to dark, usually starting with the largest, lightest areas and finishing with the dark details.
- Let each layer dry before placing the next stencil on top, so it does not stick to or lift the paint underneath.
- Line up the next sheet using the registration marks, stick it down, and spray.
A simple way to try this with letters: spray a stencil word in a bright color, then shift the same stencil a little down and right and spray a dark shadow behind it. The 3D graffiti letters page explains how drop shadows and depth work.
How to fix common stencil problems
| Problem | Likely cause | Fix |
|---|---|---|
| Paint bleeding under edges | Stencil not flat, coat too heavy, spraying at an angle | More adhesive, burnish edges, thinner coats, spray straight on |
| Fuzzy, soft edges | Can held too far away, or stencil lifting slightly | Spray from 8–12 inches, press edges down |
| Torn bridges | Bridges too thin, dull blade | Thicken bridges in the design, change the blade |
| Drips and runs | Can too close, or lingering in one spot | Keep moving, use thinner coats |
| Stencil sticks to the surface | Too much adhesive, or permanent adhesive | Lighter mist, use repositionable adhesive only |
| Vinyl pulls paint off the wall | Vinyl adhesive too strong for the surface | Use low-tack stencil vinyl, peel slowly at a low angle |
How to clean and store stencils
- Clean while the paint is fresh. Wipe Mylar and acetate with a rag and the solvent your spray paint label recommends. Dried paint is much harder to remove, and thick buildup blurs the edges.
- Remove old adhesive when the stencil stops sticking evenly, then re-mist before the next use.
- Store flat. Keep stencils in a folder or between sheets of wax paper, never rolled or folded, so they lie flat next time.
- Retire card stencils once they curl or the edges soften with paint. Cut a new one from the same printout.
Safety and where to paint
Spray paint gives off solvent fumes and fine mist. Wear a respirator with organic vapor cartridges, not a paper dust mask, plus gloves and eye protection. Work outdoors or with strong airflow, keep cans away from heat and flames, and let pieces dry somewhere ventilated.
Stencils work best on things you own: canvas, wood signs, furniture, clothing, skateboards, plywood boards, or a legal wall. Painting on property without permission is illegal in most places, however quick a stencil is.
What to make next
Start with something small and forgiving, like your initials or a house number on a board. Make the letters in the stencil maker, cut them from cardstock, and spray a few test pieces before you buy Mylar or vinyl. For more lettering ideas, browse the graffiti alphabet or the graffiti styles guide.